

Table of Contents
To create nice skeletal animations for your model, you need to add some bones ( aka armature or rig ) to the model. These bones are just like the bones of humans and define where the joints are. In a second step, you need to define where and how much the skin, your model, is moved by a bone. In a third step, you need to create some animations that move the bones and skin like for example an idle or attack animation.
Rigging
First, you should think about where you want to add joints to your model to animate it. The bones will move the surrounding mesh with the animation.
Add bones to all areas of the statue you want to animate or pose.
- Switch to the Modeling workspace.
- In Object Mode select the statue and enable Properties Editor -> Object tab -> Viewport Display -> Wireframe and All Edges to always see the wireframe of your object.
- Use Shift + C to move the 3D Cursor to the pivot point of the statue and the scene position 0, 0, 0.
- In Object Mode use 3D Viewport menu bar -> Add -> Armature to add your first bone. This bone is the root / parent bone of all other bones. All other bones will directly or indirectly be connected to this bone.
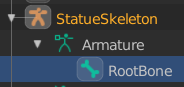
- Name the Armature object StatueSkeleton in the Properties Editor -> Object tab. And name its only bone RootBone.
- Because this RootBone shouldn't move the skin of the model disable Properties Editor -> Bone tab -> Deform.
- To always see the bones, select the bone and in the Properties Editor -> Object Data tab -> Viewport Display -> enable In Front.
- To get more information about the bone's influence on the skin set Properties Editor -> Object Data tab -> Viewport Display -> Display As -> Envelope.
- The big root of the bone should now be and remain at the pivot point of the statue. The slim tip of this first bone should be moved to the hip of the model. Use this tip as a start point to add all bones and rig all the areas of the statue you want to animate. You are also going to lock the transform of this base bone later.
- Select the bone and switch to Edit Mode and drag the small tip of the bone to move it to the hip of your model. Press X-, Y- or Z key while dragging to limit the movement to one axis.
- Press E key in Edit Mode to extrude a new bone that is connected to the selected bone.
- If you select the root of a bone you can create another bone starting at the same origin with the same level in the hierarchy.
- If you select the tip of a bone you can create another bone starting at the tip with a lower level in the hierarchy, which is what you normally want.
- To Subdivide in Edit Mode, to create two or more bones out of one or more selected bones, use the 3D Viewport menu bar -> Armature -> Subdivide. Set the number of cuts in the Operator panel.
- Make sure you rename all your new bones with a meaningful name.
Optimization: You can disconnect and move bones away from each other to save the number of bones you need to rig a model. Select the last bone in the hierarchy and disable the Properties Editor -> Bone tab -> Relations -> Connected. Then move the bone.
- As a final step apply the object transform by switching to Object Mode in the 3D Viewport. Select the bones object and apply the transform for all objects: 3D Viewport menu bar -> Object -> Apply -> All Transforms
- Save the project as StatueRigged.blend.
TODO: If you want to add more bones later you need to select the statue and the bones again and then choose 3D View -> menu bar -> Object -> Parent -> Armature Deform -> With Empty Groups instead to keep your weight painting and connect the new bones to the mesh.
Weight Painting
The weight painting determines which part of the statue will be influenced by the movement of one specific bone. The warmer the weight paint color is the more the statue mesh is influenced by the specific bone. A dark blue color means that the mesh isn't animated by this specific bone at all.
Prepare
To link the statue to the bones in Object Mode select the statue object first and then Shift + Select the bones / armature object. To link the statue to the bones click 3D Viewport menu bar -> Object -> Parent -> Armature Deform -> With Automatic Weights.
- To see the weight of each bone select the model and switch from Object Mode to Weight Paint mode and select the bone in the Properties Editor -> Object Data tab -> Vertex Groups.
- To see the influence of the bone on the mesh switch to Object Mode select the bones-object and set it to Pose Mode.
Select a bone and press the R key to rotate the bone and all its children around the bone's origin. Use the rotation to check if all bones move the intended piece of mesh. Press the ESC key to cancel the rotation! Don't apply any of these test-rotations. The mesh and rig should stay where it was when you set it up!
You can use the base bone to check if the whole mesh is rotated to make sure all vertices are assigned to a bone.
Sometimes the default automatic weighting doesn't work good enough so you'll need to fix the weight of some bones manually.
Paint
Normally one area of the mesh should only be effected by one bone, except the mesh areas that are located between two bones. The sum of influence should always be 100% ( weight of 1 )! So one area of the mesh should not be influenced by e.g. two bones with 100% from each bone ( sum of 200% ) because both bones would animate this area. On the other hand, all areas of the mesh should be influenced by at least one bone ( with some % ) or this part of the mesh can't be moved at all by any animation.
- If some bones do not animate the mesh exactly as you want, select the mesh and switch from Object Mode to Weight Paint mode and select the bone in the Properties Editor -> Object Data tab -> Vertex Groups.
- Activate the Tool Shelf ( T key ) to find the different Brush tools. Right-click on the mesh to open the context menu with the brush settings.
- The Weight of the brush sets the animation weight directly when you use the Draw brush. Although it is also influenced by the Strength value. A weight of 0 will draw dark blue ( no influence ) and a weight of 1 will draw a dark red ( full influence ).
- To add more weight to an existing weight value use a Strength value smaller than 1.0 like for example 0.2. Or set the Properties Editor -> Context tab -> Brush -> Blend mode to Add.
- To subtract weight from an existing weight value use Properties Editor -> Context tab -> Brush -> Blend mode to Subtract.
- For a fluent, smooth transition between two weights use the Blur brush.
- Finally, you need to normalize the weights of each bone to make sure the vertices don't get influenced by too many bones at the same time with 3D Viewport menu bar -> Weights -> Normalize All.
When you are happy with the bones' influence on the mesh, save the project as StatueWeightPainted.blend.
Posing
Select the bones object in Object Mode, then switch from Object Mode to Pose Mode to pose the bones of the model by selecting the bone and press the R key to rotate the bone ( and S key to scale the bone ). Confirm the change with a left-click.
Save the project as StatuePosing.blend.